|
In our home, we have a ridge vent combined
with the recommended amount of soffit ventilation. This works great
in the winter for removing heat and moisture but in the summer this system
does not remove heat well when the wind is blocked by our southern
exposure trees and the temps climb into the 90's. On such hot days,
the attic does not cool and consequentially our home stays hot through the
night. So I decided to install a power gable vent run on a
thermostat. The installation procedure I used is shown below.
Step 1 - Plan out where your vent
will go in your attic and where your louver will go. Read through
all the steps below to get a better idea of how you will complete this
job.
|
Step 2 - Obtain power vent and
needed exterior louver. I obtained my vent and louver at a
Menards Home Store. It was an AtticAire brand fan with automatic
thermostat capable of moving 1320 cubic feet per minute. The fan was
$54 (not bad) and the louver was $39 (ouch!). I replaced the
fiberglass screen on the louver with 1/8" hardware cloth glued on with
construction adhesive to get better flow.
|

Click On Photo To Enlarge |
| Step 3
- Make a hole for the louver. The hole should be 1/4" to 3/8"
bigger than the louver so you can adequately calk around the louver. A
sawz-all type tool works well for cutting this hole if you have wood
siding. The square opening at the top of my hole is where a smaller
louver was previously. I had to place a piece of patching siding at
the top. |

Click On Photo To Enlarge |
| Step 4
- Install louver by fastening to the sheathing. In my case,
because of the thickness of my older wooden siding, I had to cut away
the sheathing and attach the louver to the siding. For newer siding,
you should be able to attach to the back of the sheathing. Caulk
around the entire edge of the louver with a good exterior caulk. Prime
if needed and then touch up around the louver with exterior matching
paint. |
Click On Photo To Enlarge |
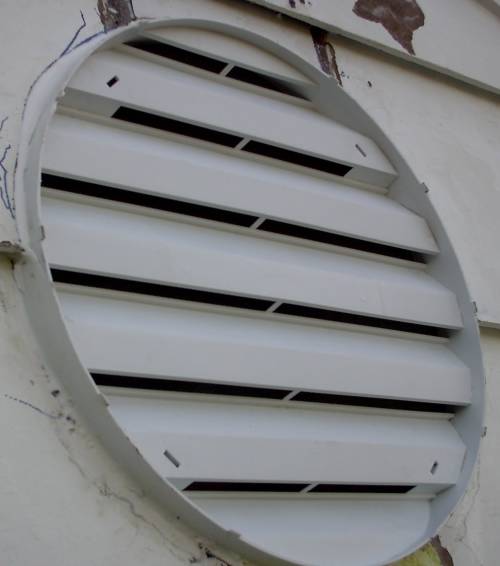
| Step 5
- Snap on the louver cover. Not much to this but I thought I would
treat you to a picture of a $39 plastic louver with its cover on! |

Click On Photo To Enlarge |
| Step 6
- Make a frame for your gable vent. In my case, I had to cut the
ends of the trusses and replace the cut out region as shown to the
right. The illustration on the right shows how the new frame (in
green) is used to both form a box for attaching the fan and as a
reinforcement header to make up for the vertical part of the truss cut
out. |

Click On Photo To Enlarge |
| Step 7
- Cut out a piece of sheathing or plywood to attach to the frame of
Step 6. Cut out a hole for the fan, attach the fan to the plywood, and
then attach the plywood to the frame. |

Click On Photo To Enlarge |
Step 8 - Wire your fan. If you
are not sure how to do this, seek help from a qualified person.
BACK TO "HOW TO" PAGE - CLICK HERE
Search Drywallinfo Using Search Box Above!
Copyright 2014 - Michael Sakowski -
More Info -
Privacy Policy
- Decorative Wall Art
|
