|
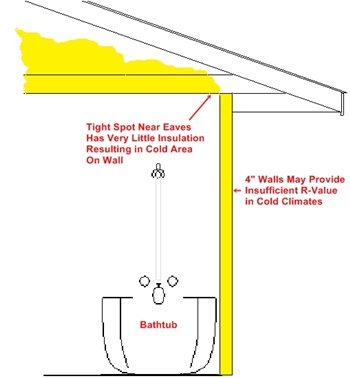
The Big Problem We Had was caused by exterior walls that were not thick enough for our cold climate, coupled with insufficient insulation in the tight spot of the attic near the eaves. And if you look at the photo of our black mold, you can see that this is exactly where mold would form.
We needed to get better R-value in both our wall and ceiling, especially near the eaves.
|
Click On Photo To Enlarge |
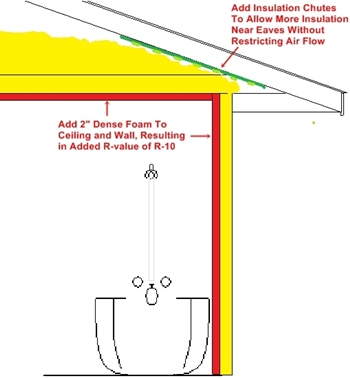
Solution 1 -
Remove Ceiling and Exterior Wall Drywall and Extend Them In 2"- This is the solution we chose since we were replacing our tub anyway. And we really wanted the 6" exterior wall. Also, we installed insulation chutes to maximize insulation near eaves.
The dense insulation on the ceiling eliminated cold spots that you sometimes get over studs and rafters.
Remove ceiling and exterior drywall and replace with mold resistant drywall.
Note: Surfaces that are routinely wet should not consist of drywall, but rather tile over waterproof backer board.
|
Click On Photo To Enlarge |
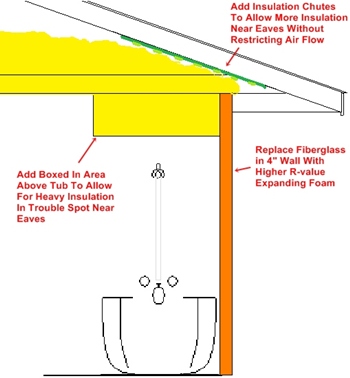
Solution 2 -
Box In Area Above Tub and Replace Fiberglass With Higher R-value Expanding Foam - We almost went with this solution as it would not involve the involved task of replacing the tub. Since our tub had cracks and needed replacing anyway, we went with Solution 1.
Installing the expanding foam in the walls is best done by a professional although you could possibly do this yourself with a kit. If you are not in a cold climate then replacing wall insulation may not even be needed.
If you currently have mold, I would recommend removal of ceiling and exterior drywall (down to the tub/shower) and replacement with mold resistant drywall. |
Click On Photo To Enlarge
|
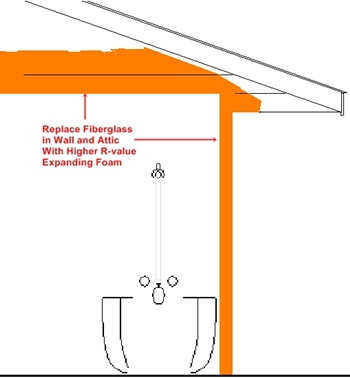
Solution 3 - Have Expanding Foam Installed in Ceiling and Exterior Wall - This is definitely NOT a DIY job - hire a professional as they can spray foam in tight spots with specialized equipment.
Replace ceiling and exterior wall drywall with mold resistant drywall. Consult with the insulation contractor you are hiring for instructions on whether to install the new drywall before or after they install the insulation.
This is probably your quickest solution to a bathroom mold problem. For us, however, this would not work because we had a solid wood header at the top of all our exterior walls, thus no insulation could be applied - and this was where the mold was forming. |
Click On Photo To Enlarge
|


