|
Everybody who has drywall (sheetrock) walls will
eventually get a hole in one of the walls and need to do a drywall repair.
Most commonly, a door knob will punch through a wall. The
instructions on this page provide all the steps to repair such a hole. Is
your hole much bigger? If so, watch the
10-part Video Series on Large Hole
Repair.
Here is a picture of the hole: 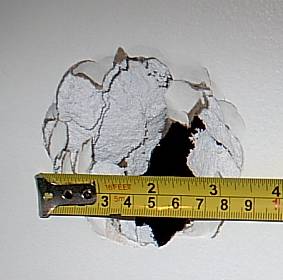
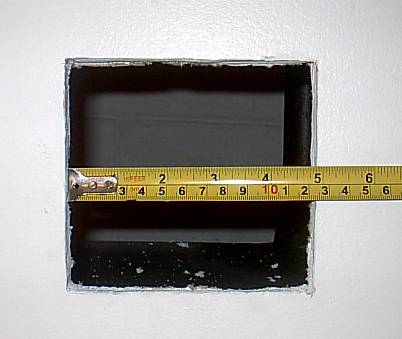
Step 1 -
Cut out a square area in the drywall
just big enough so the edges are clean as
shown here.
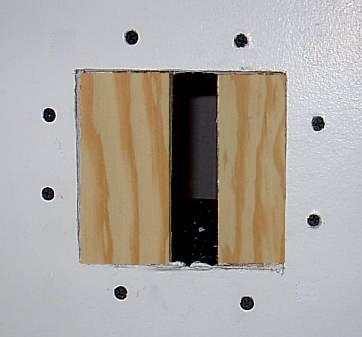
Step 2 - Cut out two strips
of plywood that are
about 4 inches longer than the hole. Don't use plain wood since it may split when
screws are fastened.
Step 3 - Place the wood
strips inside the hole and fasten with drywall screws as shown below. Stay
about an inch or more from the edge of the drywall when applying screws.
Step 4 - Cut a patch piece
of drywall about an eighth of an inch smaller in each dimension.
Fasten the patch piece
securely as shown here.
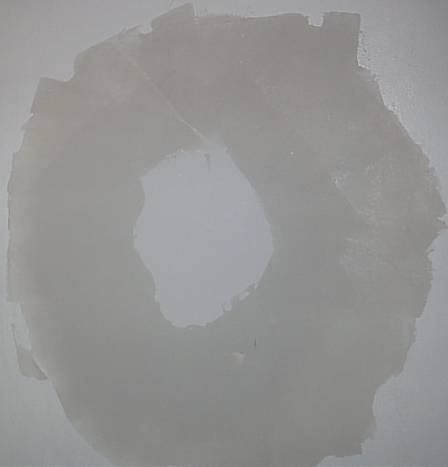
Step 5 - Use a
4 or 5 inch putty knife
to place a very thin coat of joint compound (mud) extending several inches
beyond the edges of the hole
as shown here. Don't put too much compound on or you will create a
wavy or bumpy surface.
Step 6 - After the mud is
thoroughly dry, use a dry
10-inch knife to
knock off any bumps or high spots. Hold the knife perpendicular to the
surface and scrape until the surface is level as
shown here (Note:
this was a picture from finishing an outside corner) .
Step 7 - Use the 4-inch
knife to apply another coat of mud that is about 1 or 2 inches beyond the
first coat. Wet down the 10-inch knife and draw off most of the
compound by applying steady pressure while moving the knife across the
surface as shown here.
Avoid leaving too much mud on the wall!
Step 8 - Scrape the surface
down with the dry 10-inch knife as you did in step 6. Don't sand
yet!
Step 9 - Repeat Step 7 and place another coat
that 1 or 2 inches beyond the last coat. Use the wetted down 10-inch
knife to draw down the surface. You may need to make several passes to
draw down the entire surface.
Step 10 - Again, scrape
down the dry surface with the dry 10-inch knife. Get your surface level
and free of bumps or ridges by using your knife to level things out. Don't
sand yet!
Step 11 - Place another
coat of mud that overlaps the edge of the area as shown below. Use
the wetted down 10-inch knife to draw down the surface to make this a very
thin coat - this will be your final coat except for touch up.
As you can see on the right, most of the compound is drawn
off with the 10-inch knife.
Step 12 - Scrape down the surface again with the
dry 10-inch knife and the dry 4-inch knife. I find I can apply more
pressure with the 4 inch knife gripped with 2 hands. Knock off any ridges
or high spots. Don't sand yet.
Step 13 - Take a
trouble light or lamp
and shine a low angle light on the surface of your drywall repair.
Apply small amounts of well thinned out mud with your 4 inch knife to fill
in scratches, depressions, pinholes or other defects. Immediately
use the 4 inch knife to scrape off most of what you applied.
Step 14 - Scrape down the
surface again with either dry knife. Then, sand very lightly
with 220 grit or 400 grit paper. If needed touch up with small
amounts of mud again. The entire area from this small hole ended up being
15 inches across,
but the end result is a surface that shows no trace of damage.
Step 15 - Prime your wall with a
latex primer suited for drywall (most are). Then paint to match the
existing wall. For best results, reprime and paint an entire section of
the wall up to a corner or doorway. Remember to show your friends the nice
job you did on this drywall repair. Tell them about this web site
drywallinfo.com !

Here's the patched area, primed and painted. Even
with the low angle light (see on right), there is no sign of the drywall
repair to be found!
Our website is made possible by displaying online advertisements to our visitors.
Please consider supporting us by disabling your ad blocker.
Search Drywallinfo Using Search Box Above!
Copyright 2014 - Michael Sakowski -
More Info -
Privacy Policy
- Decorative Wall Art
|
