If you have mastered taping a regular drywall joint,
you are now ready to try an inside corner. I have a method for
inside corners that provides near professional results. It involves
a few more steps however than what some others may show you. The steps
shown on this page are for a regular 90-degree inside corner.
Preparation - Read the
summary given here.
It will make it easier to successfully follow the needed steps. Also, watch my video at the bottom of this page to get a good overview of the steps. Make sure all drywall is securely
fastened on both sides of the corner. There should be
proper corner backing
to secure the drywall. If you have gaps between sheets more than 1/8"at the corner, fill gaps with a low shrinkage sandable patching plaster or spackle (seen here).
Applying the Tape - Precut your paper tape the length of the
joint. Also prefold the paper tape so it is easier to fold when you
are ready to apply it. I would avoid metal-backed inside corners
available since they are notorious for improperly adhering (and thus
causing air pockets) if the corner is not perfectly uniform - stick with
plain old paper tape.
Are you taping a corner where 2 other corners meet?
If
so, see this taping guide.
Thin the mud a little by dipping your taping knife in water and mixing in. Apply slightly-thinned mud on each side
of the corner. You should place adequate mud on each side (and the corner
itself) so there will be no voids or bare spots when the paper is applied.
The mud should be applied about 2 inches wide on each side of the
corner.
Quickly pass your paper tape through a bucket of water. Fold the wet tape and apply to the
corner by hand. Press the inside of the corner in as far as possible
to avoid any pockets. Wet your 4 or
4.5 inch taping knife down
with water. Then, hold the tape at the top and draw your 4 or 4.5
inch knife down each side of the corner, applying pressure to squeeze out
mud from under the tape. Avoid snagging at the corner itself. You may notice that the tape will start
to "bunch up" a little. When this happens, pull the tape down from
below to get rid of the slack.
Apply More Coats - Before applying any coats, use your 4.5 inch dry knife to scrape the surface and knock off any bumps or ridges off the dried coat - it is important that you have level surfaces. Do not sand until the very end - rather use your taping knife to level the surface. Use the 4 or 4.5 inch knife to place a 3 to 4 inch wide coat of mud on each side of the corner that is
about 1/2 inch from the corner as shown below on the left. Wet the knife down by dipping in water and skim the mud up (or down)
the entire length, exerting enough pressure to make a thin uniform coat as shown below on the right.
Do this on both sides of the corner. You now will have a recess at
the corner to be filled in with the next coat using a corner
tool!
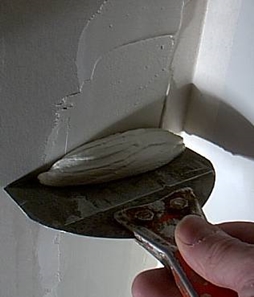
Apply another coat on each side right up to, and into, the corner - it should extend about 2 inches from the corner in each direction. Then use a
corner tool, that has been dipped in water to firmly skim off the mud, as shown below. I find it easier to work top to bottom. You can see how the mud has been applied and I am skimming it level in the photo below.
Apply 5" to 6" wide
coats on each side of the corner taking care to stay about 1/2" to 1" from the corner as shown here. - Use a 10 or 12 inch
taping knife to skim off these coats on each side of the corner. Use
sufficient pressure so there is not a buildup near the corner.
It should look like
this.
If you have created a new recession at the
corner, use the corner tool to fill it in although you
shouldn't have to if the coat was thin enough and enough pressure was used
in drawing down the coat. Otherwise, fill in any drag marks with a small
amount of thinned mud by drawing down the knife perpendicular to the mark.
Fill in any voids as well. If you are seeing faint washboard-like waves
even after knocking down the surface, you can remedy this nicely by
applying a very thin coat of thinned mud drawn perpendicular to the waves
as shown here (this was an outside corner)
- this is a much better move than trying to sand the surface level!
When this step is completed, you should have a wall
that would look half-way decent even if you did not sand.
Here is a picture of the
wall I have been documenting for this site before sanding.
Lightly Sand, Prime, and Paint - Lightly and sparingly
sand with 220 grit paper on a 3" by 8" sanding block. For problem
areas such as the meeting of two corners at the ceiling, you may need
coarser grit paper but use it with restraint! Vacuum the surface off.
Shine a trouble light
or lamp at a low angle to see any scratches, voids, or drag marks that
need to be filled in. Use small amounts of thinned mud firmly drawn
down with the 4.5" or 10" knife (I like to use the 4.5 inch knife for
this). If your job passes the low angle light test, you have a
completed the job well.
Avoid sanding the paper surface of the drywall!
Prime with a latex
primer. Don't work the primer around too much - it can lift
compound! Paint with a latex paint. Note that some primers
require you to paint within 48 hours of priming.
Show your friends the
nice job you did. (here's a pic of the
painted wall I documented for this site) Tell them about this web site
drywallinfo.com !