|
In my community, I volunteer to lead projects for our
Bayfield County 4H. This year, I taught drywall taping and finishing
to a small group of 5 kids. I made some frames out of scrap wood that had
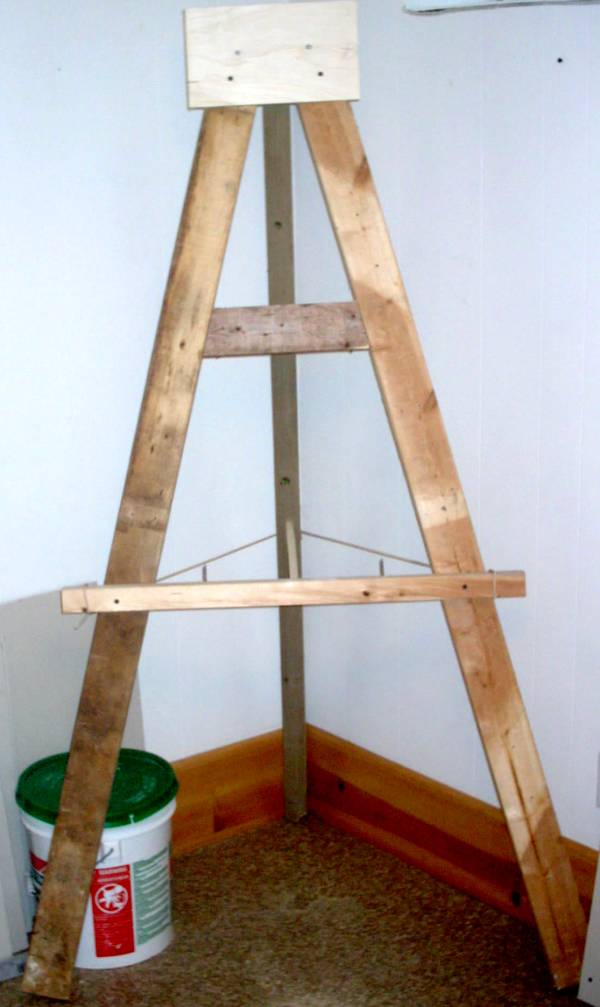
a vertical piece in the center where two pieces of drywall would meet as
shown on the picture below on the far right. The joint is then taped and
finished on an easel that allows for the piece to be clamped in place.
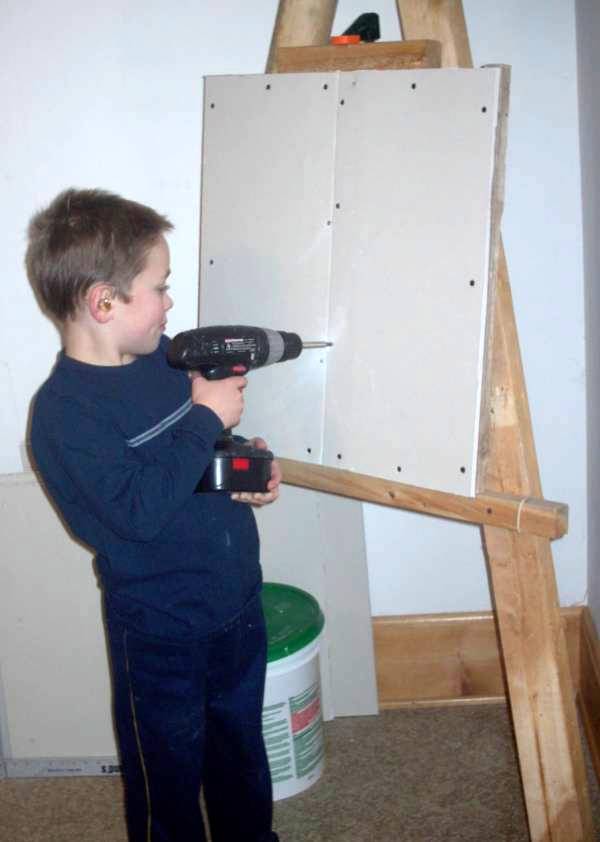
- Meeting #1 - The kids cut two pieces to fit on a
frame and then fasten the pieces on the frame. They learned how to mark,
score, and cut drywall, and they also learned how to fasten the drywall
with screws. For 9 year old Mark shown in the photo below, it was a
little challenging to put enough pressure on the drill but he managed.
We stressed the importance of trying not to imbed the screw too deep so
as to break the paper but deep enough to keep it below the surface.
Click here to see pictures of the fastened
drywall from this step for each student.
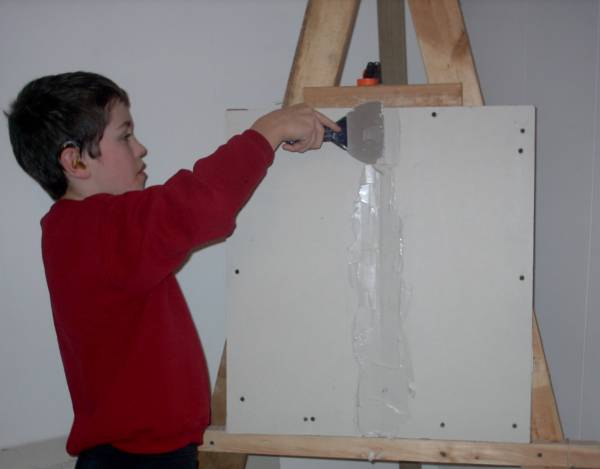
- Meeting #2 - Each mini-wall is taped. We place
the frames on the easel (shown above in photo) and place compound and
tape on the joint. The paper tape is quickly passed through a bucket of
water to insure no air pockets were trapped underneath and the 4" taping
knife was used to imbed the tape and squeeze out the excess mud. This
went well for all the kids, regardless of the age of the student.
Photos of the kids taped joints are shown here.
- Meeting #3 - Scrape off any irregularities and place
a coat on over the tape and use the large knife to scrape off the excess
leaving a uniform thin coat over the tape that fills the recessed area
where the pieces meet. This is done one frame at a time on the
easel. Photos are shown here
- Meeting #4 - Scrape off any irregularities and place
a second coat on over the previous coat. This is done one frame at
a time on the easel. Photos of this second coat
are shown here
- Meeting #5 - Scrape off any irregularities and place
light 6" wide coats on each side of the joint leaving about 4" uncoated
in the center. This is an alternative to the very wide coat applied by
professionals but is much easier to handle for the DIYer.
- Meeting #6 - Scrape off any bumps and place a light
6" wide coat down the middle, bridging the previous 2 side coats. The
result is an extra-wide coat of about 14-16" wide. This will be the
final coat except for touch up work & sanding done in the last step.
Photos of this last coat are shown here
- Meeting #7 - Prime and paint. This involved
ordinary interior painting techniques, which for most of the kids, was
another new technique.
 |
 |
 |
 |
The easel has three legs. The
back leg was on a hinge. A 1/2" flexible length of poly pipe was used
to keep the easel opened, along with some clothes line. Several screws
protrude up and fit into the practice frames to keep them in place for
the kids. |
 |
Search Drywallinfo Using Search Box Above!
Copyright 2014 - Michael Sakowski -
More Info -
Privacy Policy
- Decorative Wall Art
|
