|
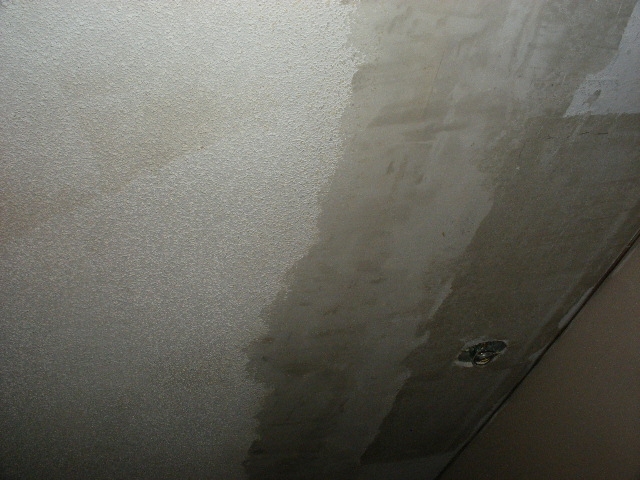
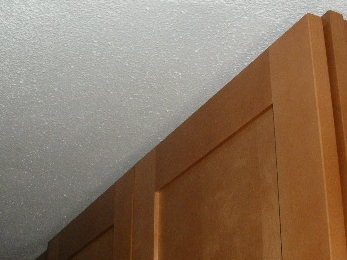
For many years I avoided the topic of texture repair on this site. Almost all of my drywall is not textured (I avoid it!) but still my kitchen and living room ceilings (previous owner) have texture. And my texture is the worst kind - it is popcorn type sprayed on with very expensive equipment by skilled tradesmen! Once I had to hire a crew to retexture half of my ceiling that had to be replaced and it cost about $400! We just remodeled our kitchen this summer (2012) and the new cabinets extended all the way up to the ceiling, where as the previous cabinets had a boxed in area. The result was a 5" gap of no texture in front of the cabinets which really looked bad. I first tried a few spray products. I won't mention brand names, but these spray can products are very frustrating to use for more than a very small patch - I had inconsistent globs here and there and a big mess! After wasting $40 on spray can products, a friend suggested roll-on texture added to the paint - I then proceeded to remove the random blotches I sprayed and did a thorough job prepping the surface, followed by rolling on the textured paint. The result was fantastic, as shown in the very bottom photo below, and the cost was under $10 for the additive and the (reusable) texture roller. The method I used is shown below, step by step. Note the this method would also work for a large patch on a repair.
Step 1 - Scrape any paint lines off . We had a large paint line that showed through my first attempt very badly. In my second attempt, I scraped the surface free of the paint line. Also, bevel and feather the texture edge to create a smooth transition from texture to smooth surface. Do ALL of this with a 4" or 5" taping knife, firmly scraping the surface - do NOT sand!
Step 2 - Place a wide coat of joint compound using a 12" knife that bridges your texture area and not texture area. This will further "feather out" your transition. Since your texture surface is not level, you will get some small ridges and a "washboard" effect. The next step, will take care of this however.

Step 3 - Using your 4.5" or 5" knife, scrape your dried drywall compound surface to remove as many bumps and ridges as you can. Scrape perpendicular to the ridges. Then, place light coats of slightly thinned down joint compound applied with your smaller knife and drawn down perpendicular to the ridges of your last coat. This will fill the ridges and level out your coat. Try not to put a lot of compound in your texture area and stay in the smooth area and near the edge, as shown in the photo below. Note that I do not have a straight transition line but rather one that wanders back and forth to produce a "blending" effect.
The light coats applied will dry fairly quickly and within an hour or two, you can add more thin coats and also add thin coats to any edges to produce a smooth wide transition coat. I did not sand AT ALL, but rather I used my taping knife to knock down the surface as needed.
Prime your surface, like any other finished drywall, using a suitable primer.

Check Out My New Site! How To Set Up and Level The Ground For an Intex Easy Set Pool!
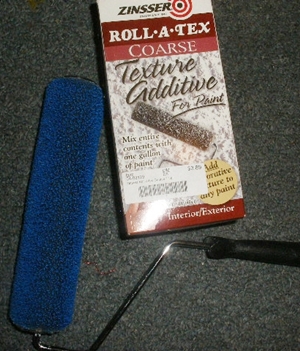 Step 4 - Obtain your paint additive - you might call around to find a paint store that has Zinsser Roll-a-Tex Texture Additive (see image on right) and then take a sample of your texture with you (if possible) so as to choose the right size additive (I used coarse size). Also, obtain a texture roller that consists of plastic loops like the one shown right and here. You will want a large tarp to cover everything nearby - this becomes a very messy job. Mix your texture in as directed. I measured 1/4 of my 1-pound container of additive and mixed with a quart of paint since the whole pound of texture additive was to be mixed with a gallon of paint. Step 4 - Obtain your paint additive - you might call around to find a paint store that has Zinsser Roll-a-Tex Texture Additive (see image on right) and then take a sample of your texture with you (if possible) so as to choose the right size additive (I used coarse size). Also, obtain a texture roller that consists of plastic loops like the one shown right and here. You will want a large tarp to cover everything nearby - this becomes a very messy job. Mix your texture in as directed. I measured 1/4 of my 1-pound container of additive and mixed with a quart of paint since the whole pound of texture additive was to be mixed with a gallon of paint.
Roll on your textured paint, very much like you would roll on any other paint using random motions. If needed, you can put on a second coat after this dries. I did not need to add another coat. Best part was that my texture also served as my painting - I was done and it looked great - See below!
Search Drywallinfo Using Search Box Above!
Copyright 2014 - Michael Sakowski -
More Info -
Privacy Policy
- Decorative Wall Art |
