How To Tape and Finish Drywall Joints Where Two Recessed Edges Meet
Note: If the joint is along 2 edges, you will
notice that the joint sits in a
recessed surface. This recessed surface will allow you to cover
the tape easier in subsequent steps. If the joint is along two
ends, the surface is not recessed and you would have what is called a butt
joint. You should use a
modified
procedure for butt joints shown here.
STEPS FOR TAPING A JOINT
Step 0 - Make sure ALL screws are
set below the surface. There is absolutely no way to finish a
surface properly if a screw is sticking up since the knife will always hit
this bump. You should run a knife over all screws - if the knife hits a
screw head, the screw must be set in further. Do not
rupture the paper surface by setting the
screw too deep - if you do, install another screw nearby within an inch or
so. If the gap between pieces if more than 1/8", you should fill it
before beginning - I would recommend using a fast drying, low shrinkage patching plaster or spackle (seen here) for filling gaps.
Is one edge recessed and the other not recessed? If so, then you should fill
in the recess before taping. Do this by placing compound in the recessed
area and skimming it level with a wide taping knife. Let it dry. Place
another thin coat on, if needed to fill in shrinkage of the compound,
skimming it level again. After this dries, knock off any bumps sticking
up. Follow the procedure shown here to make the two surfaces level. Then, use the butt joint procedure for taping this joint.
Cut tape to the length of all joints you will be finishing. You don't want
to be doing this while your mud is drying up on you.
Are you taping a wall joint that meets a corner joint?
If
so, see this taping guide.
Take an ample supply of mud and place in the
pan. Wet your 4.5 inch knife
with water and stir up the mud, slightly thinning the mud. Do not pour water directly into the mud but rather bring in small amounts that are left on your wet taping knife. Repeat if needed.
Step 1 - Place
mud on the joint at a width slightly
more than the width of the tape. Make sure ALL the surface where the
tape will be placed is covered with an ample supply of mud. Leave no bare
spots! Don't worry if there is a little excess. If your mud is
thinned out properly and the tape is wet down, the excess will come off.
Now here's a great tip:
Very quickly pass the tape piece through a
bucket of water wetting both sides of the tape. Shake excess water off the tape.
Place the tape on the mud, covering the joint. Center the tape over the
joint.
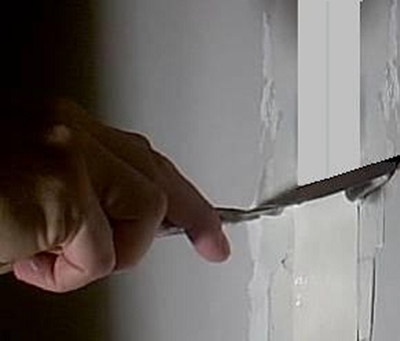
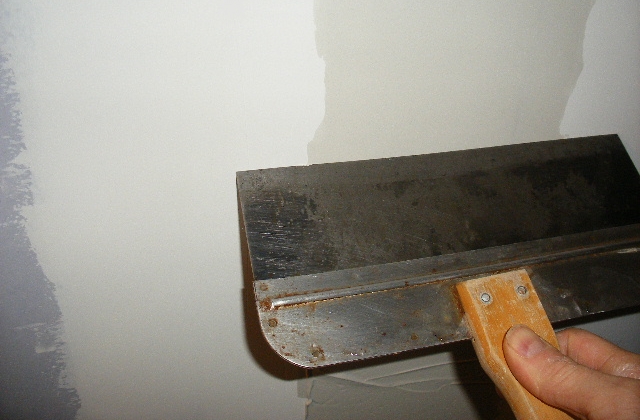
Wet down the 4 or 5 inch
taping knife. Then, hold the wet tape at the very top and start drawing the taping knife down tightly against the
tape at a slight angle. The mud should shoot out the
sides onto the knife. After a few feet, take the excess off the
knife by scraping on the pan, re-wet the knife, and draw down more of the
tape until all of the tape is securely adhered to the joint, as shown in Fig 1 and the video clip below. Use enough pressure to squeeze out the excess compound but not so much pressure that you leave the tape with dry spots underneath. Let this
joint dry thoroughly. When your tape dries,
it will look like this.
Use leftover mud to fill screw depressions, discard unused mud, and
clean tools thoroughly. Also, you can scrape off excess compound that is to the sides of your tape at this time with sideways motions, being careful not to disturb the tape that you just imbedded.
Watch a Short Video of Me Imbedding Drywall Tape!
Note: A
professional would probably apply the tape and the next coat in
one step. I don't recommend this because (in my experience), if you
move the tape while applying the coat, you get air pockets or the tape may
buckle, leaving you no other option but to immediately scrape everything
off and start over. Better for the non-professional to break this up into
two simpler steps.
Step 2 - After all is dry (4 -12 hours), use the (dry) 4 inch or 10 inch knife and
scrape down any bumps or ridges that is causing the surface to not be level for
the next coat. Often, I use two hands on the tool to exert the pressure
needed. The art of taping sheetrock is completely dependent on a level
surface to draw the knife down on the subsequent coat(s)!
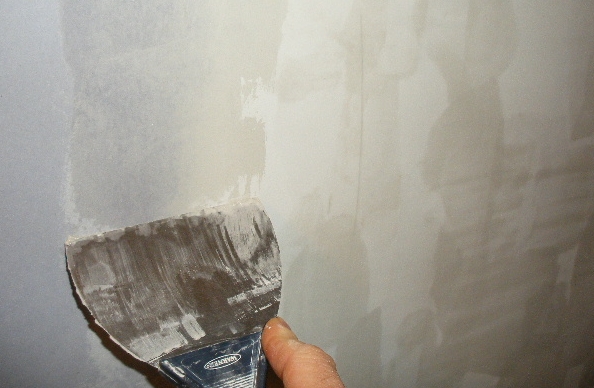
Place ample slightly
thinned mud over the tape to a width of
about 8 inches. This will extend just slightly beyond the recessed
area (if it is not a butt joint). Skim off the coat
with a wetted down 10 inch knife. Hold the knife at an angle about 45 degrees and place slight pressure on the knife
as you draw down (or up) keeping the
knife in motion as you draw. Try to accomplish this in a single
steady but solid pass and avoid getting a "washboard"
surface! Use leftover mud to fill screw depressions,
discard unused mud, and clean tools thoroughly.
Here is a YouTube video of meovercoating a regular taped drywall joint Note: In this video made years back I suggested a 6" wide coat, but 8" is probably a little better.
At this point, you may be tempted to stop applying
more coats since you seem to have filled in the recessed area and the
surface is fairly level. This is one of the most common errors!
The drywall will continue to shrink for months after it is painted and you
will see a well defined valley. You need more coats!
Step 3 - Let the mud dry. (Another
4 - 12 hours) Then, before applying more mud, use your dry 10" or 4" knife
to level out any mud sticking up or fix a washboard surface. To deal
with a "washboard surface", scrape the
taping knife perpendicular to the ridges and keep scraping till the ridges
are gone. If you hold the knife almost perpendicular to the wall, you can
scrape off non-level spots quite well. Just make sure there are no
ridges! Keep the surface level! Don't sand. In fact, you should NOT sand at all until after Step 6, and then only lightly as needed.
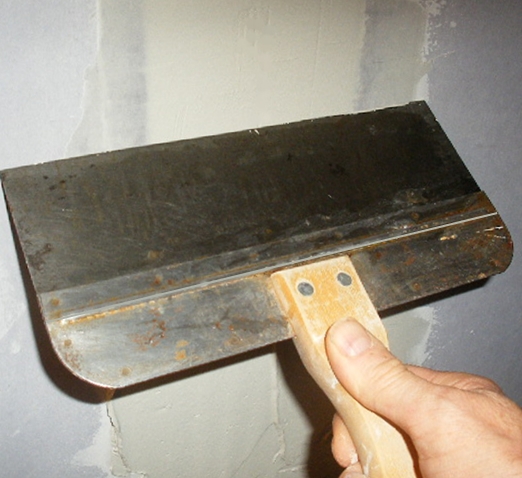
Apply another coat that
is about 10 inches wide as you did in Step 2. See Fig 3. Use ample amounts of
slightly thinned mud and skim the excess off with a wetted down 12" taping knife as shown in Fig 3. Hold the knife at about a 45
degree angle and place pressure on the knife as you did in Step 2, keeping
the knife in motion as you draw. Try to accomplish this in a single
steady but solid pass and avoid getting a "washboard" surface!
Use leftover mud to fill screw depressions, discard unused
mud, and clean tools thoroughly.
At this point, you are really tempted to stop
applying more coats since now for sure you seem to have filled in the
recessed area and the surface is fairly level. To get a professional look,
you need additional coats since shrinkage will still result in a
visible joint if you stop now.
Step 4 - Let the mud dry.
(Another 4 - 12 hours) Then, before applying more mud, use your dry
10" knife to level out any mud sticking up or fix a washboard surface.
Knock off the high spots and keep the surface level! Again, don't sand.
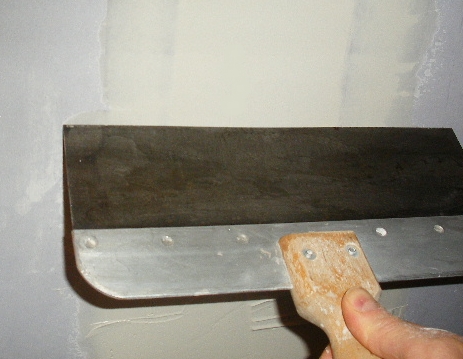
Place a light 6-8” wide coat on each side, as shown in Fig. 4, leaving about 3-4” uncoated in the middle keeping
the knife in steady motion as you apply the coats.
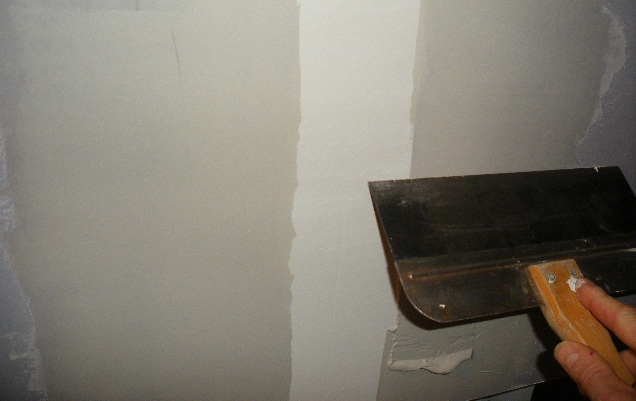
Step 5 - Again, let the previous coats dry and knock off any bumps or ridges with your taping knives. Then, place a light 6-7” wide coat down the middle, bridging the two coats of Step 4. See Fig 5 to the right. The result of this will be a coat that is now about 21 inches wide and fairly level.
Step 6 - After the Step 5 coat is dry, knock off any surface imperfections,
dust or vacuum the surface, then get a lamp or trouble light (The Light Of Truth)
and shine it at a low angle. You will see any imperfections -
perhaps more than you care to see!
Mix up some joint compound that is thinned a bit more than previously. Use this thinned mud and your 4" or 5" taping knife to fill in any drag marks, air pockets, or
other imperfections with a small amount of thinned mud applied and drawn
down tightly with either knife. Also, you can feather out the outside edges of your joint, and the result will be a finished joint that is nearly 2 feet wide, which is typical of professionally done taping job. The smaller amounts of mud
will dry very quickly (within minutes). If you are seeing faint
washboard-like waves even after knocking down the surface, you can remedy
this nicely by applying a very thin coat of thinned mud skimmed off
perpendicular to the waves as shown here
(this was an outside corner) - this is a much better move than trying
to sand the surface level! When dry, inspect again with the trouble light and touch up some more. See figure 6.
When this step is completed, you should have a wall
that would look good when painted even if you do not sand.
Here is a picture of a sample wall I taped and finished for this site before sanding.
Now, finally, sand very lightly as needed with a
sheet of fine 200 grit paper on a 3.5"x8" sanding block using a random circular motion (an 8-inch
piece of 2x4 works well as a sanding block). Dust or vacuum the surface, shine a light again,
and fill in any remaining imperfections with thinned mud firmly drawn
down. You shouldn't have to sand again. Do not use coarser grit
paper except for problem areas like the meeting of 2 inside corners, or
narrow strips where you can't properly use a knife to prepare the surface.
Avoid sanding the paper surface of the drywall!
Prime with a suitable latex
primer. Don't work the primer around too much - it can lift
compound. Paint with a latex paint. Note that some primers
require you to paint within 48 hours of priming.
Show your friends the
nice job you did. A photo of the wall I documented for this site is shown on the right - it turned out very nice!. Make sure to tell all your friends about this web site
drywallinfo.com !
OK, if you mastered taping a joint, you
are ready for inside corners.
CLICK HERE for step by step directions on taping and finishing inside corners. You can do this! And you may be surprised at the quality of your results!
Click Ctrl D to Bookmark
This Page! Tell Your Friends! Click On Share Button =>